

What are Serve Sent Events (SSEs)?
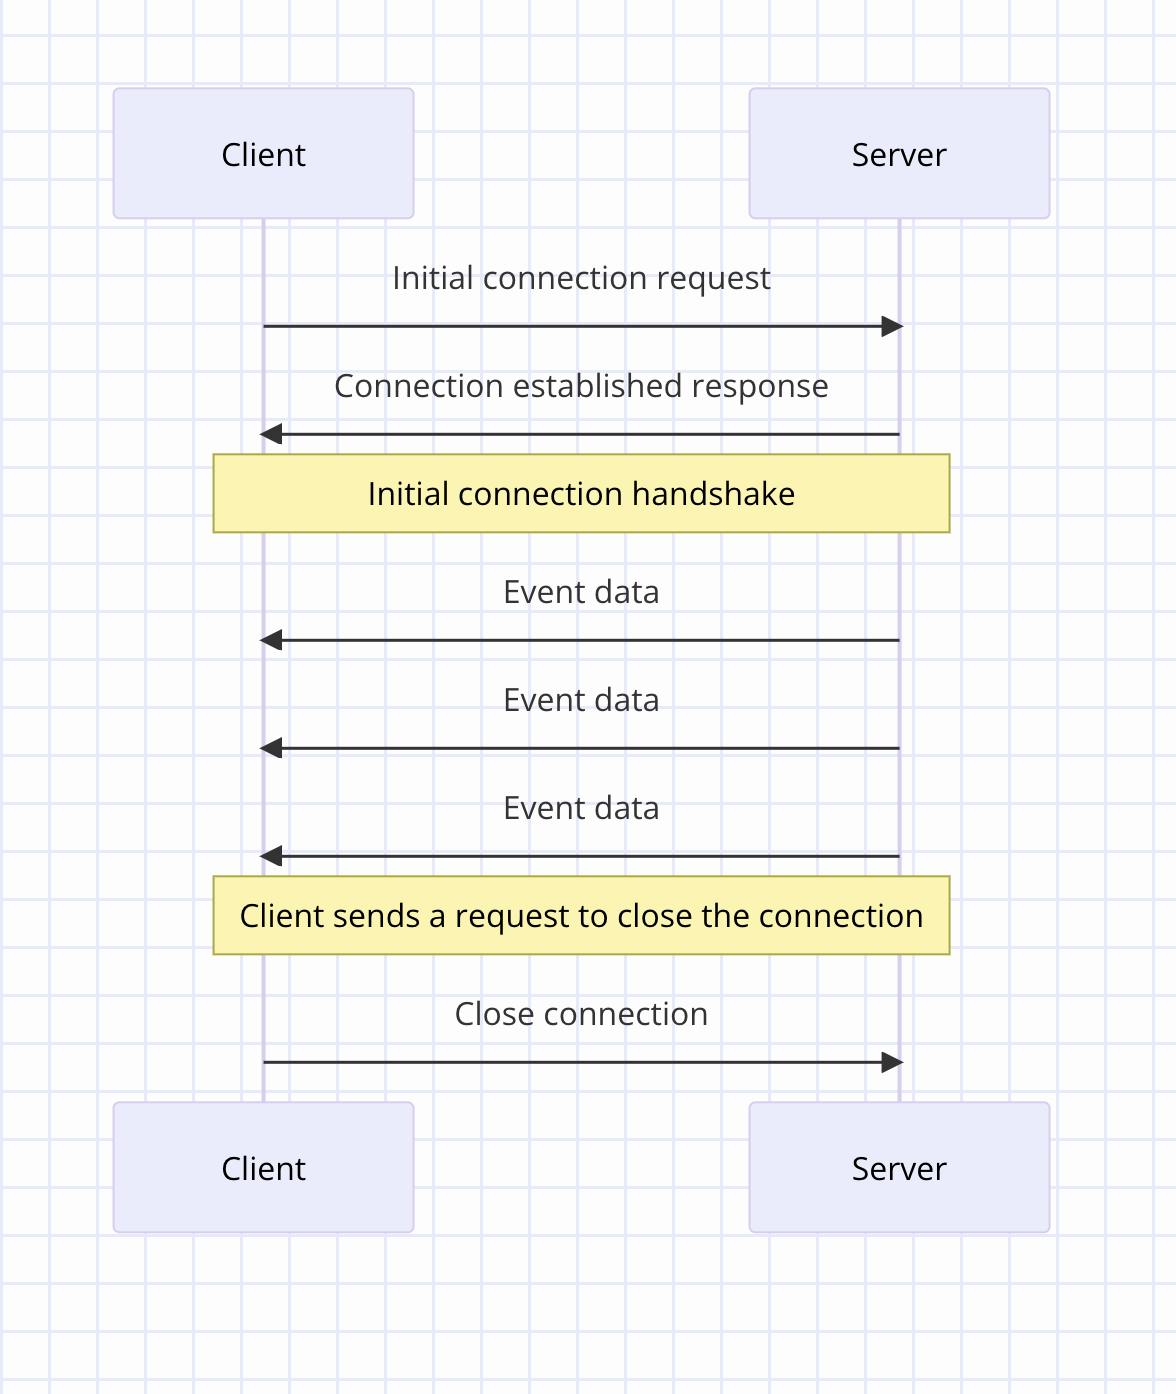
Server Sent Events (SSEs) is an HTML5-based technology that enables servers to send data to the web client without having to rely on explicit requests from the client.
How is it different from Web Sockets or Long Polling?
Though each of these techniques is used for establishing real-time communication between a server and a client, there are some significant differences between them which can help us decide which one to use based on our use case.
Check the table below 👇
| Feature | SSE | Web Sockets | Long polling |
| Protocol | Built on top of standard HTTP | Requires a special protocol (ws:// or wss://) | Built on top of standard HTTP |
| Complexity | Only supports unidirectional communication from server to client. Easier to implement, maintain, and scale as compared to WebSockets | Supports two-way communication between both client and server. More complex to implement and scale. | Simpler but less efficient than SSE and WebSockets |
| Use Cases | Live sports scores, stock tickers, news feeds, etc. | Chat applications, multiplayer games, real-time collaboration | Workaround for real-time communication when SSE and Web Socket were not widely supported |
If you are convinced of thewhatandwhyof SSE, let's start building and exploring thehowsof its working 👨💻
Building the UI
We will build a simple React application that displays a list of real-time notifications from the server.
Setting up the initial skeleton using Vite's
React-Typescripttemplate.yarn create vite my-notifications --template react-tsWe will use Tailwind for the styles (If you want to write your own CSS, you can ignore this step. But I just ❤️ TW.) Please follow the installation steps mentioned here.
Let's start writing our
<Notifications/>component which will display a list of notifications. It will look something like this.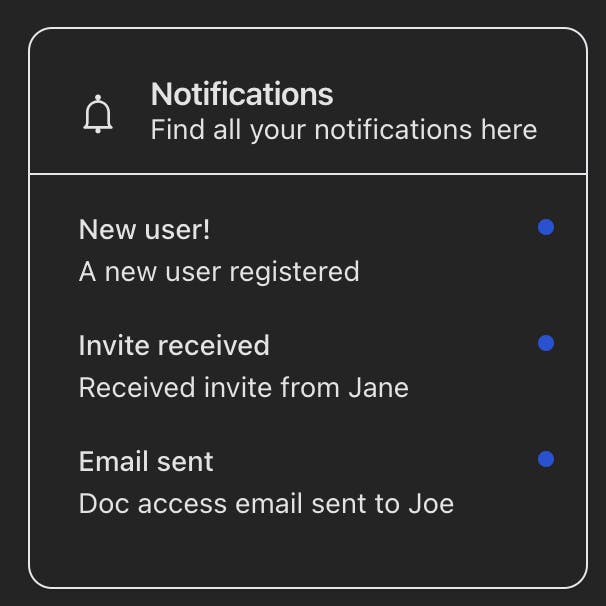
Each notification item has the following three sections:

Title
Info
A blue dot indicating an unread notification
<NotificationItem />
    import { useState } from "react";

    const NotificationItem: React.FC<{ title: string; info: string }> = ({
      title,
      info,
    }) => {
      const [read, setRead] = useState(false);

      return (
        <div
          className="-mx-2 flex items-start space-x-4 rounded-md p-2 transition-all hover:bg-zinc-800 hover:text-accent-foreground / first:mt-3 / cursor-pointer / relative"
          onClick={() => setRead(true)}
        >
          <div className="space-y-1">
            <p className="text-sm font-medium leading-none">{title}</p>
            <p className="text-sm text-muted-foreground">{info}</p>
          </div>
          {!read && (
            <div className="w-2 h-2 / rounded-full / bg-blue-700 / absolute right-0 top-2.5" />
          )}
        </div>
      );
    };

    export default NotificationItem;
<Notifications />
    import NotificationItem from "./NotificationItem";
    import useNotifications from "../hooks/useNotifications";

    const Notifications = () => {
      const notifications = useNotifications();

      return (
        <div className="rounded-xl border bg-card text-card-foreground shadow">
          <div className="flex flex-col space-y-1.5 p-6 pb-3 / border-0 border-b border-solid">
            <div className="flex items-center gap-4">
              <svg
                width="15"
                height="15"
                viewBox="0 0 15 15"
                fill="none"
                xmlns="http://www.w3.org/2000/svg"
                className="mt-px h-5 w-5"
              >
                <path
                  d="M8.60124 1.25086C8.60124 1.75459 8.26278 2.17927 7.80087 2.30989C10.1459 2.4647 12 4.41582 12 6.79999V10.25C12 11.0563 12.0329 11.7074 12.7236 12.0528C12.931 12.1565 13.0399 12.3892 12.9866 12.6149C12.9333 12.8406 12.7319 13 12.5 13H8.16144C8.36904 13.1832 8.49997 13.4513 8.49997 13.75C8.49997 14.3023 8.05226 14.75 7.49997 14.75C6.94769 14.75 6.49997 14.3023 6.49997 13.75C6.49997 13.4513 6.63091 13.1832 6.83851 13H2.49999C2.2681 13 2.06664 12.8406 2.01336 12.6149C1.96009 12.3892 2.06897 12.1565 2.27638 12.0528C2.96708 11.7074 2.99999 11.0563 2.99999 10.25V6.79999C2.99999 4.41537 4.85481 2.46396 7.20042 2.3098C6.73867 2.17908 6.40036 1.75448 6.40036 1.25086C6.40036 0.643104 6.89304 0.150421 7.5008 0.150421C8.10855 0.150421 8.60124 0.643104 8.60124 1.25086ZM7.49999 3.29999C5.56699 3.29999 3.99999 4.86699 3.99999 6.79999V10.25L4.00002 10.3009C4.0005 10.7463 4.00121 11.4084 3.69929 12H11.3007C10.9988 11.4084 10.9995 10.7463 11 10.3009L11 10.25V6.79999C11 4.86699 9.43299 3.29999 7.49999 3.29999Z"
                  fill="currentColor"
                  fill-rule="evenodd"
                  clip-rule="evenodd"
                ></path>
              </svg>
              <div>
                <h3 className="font-semibold leading-none tracking-tight">
                  {" "}
                  Notifications
                </h3>
                <p className="text-sm text-muted-foreground">
                  Find all your notifications here
                </p>
              </div>
            </div>
          </div>

          <div className="p-6 pt-0 grid gap-1 / max-h-[300px] overflow-y-auto">
            {notifications.map(({ title, info, id }) => (
              <NotificationItem title={title} info={info} key={id} />
            ))}
          </div>
        </div>
      );
    };

    export default Notifications;
Our notifications component is now ready to display a list of notifications.
If you check the component code above you will notice we are using a hookuseNotificationsthat returns an array of notifications.
This is where the actual client-side SSE magic 🪄 is happening. But before diving into that let's understand the EventSource interface.EventSource interface is a browser API that helps the client open a persistent connection to the server and start receiving events from it.
It also takes care of a few internal intricacies like automatically trying to reconnect to the server whenever the connection is lost.On the client side, mainly three things need to be taken care of:
Establishing the connection
To establish a connection, we need to create a new EventSource instance and pass it the URL of the server streaming the events.const eventSource = new EventSource("http://localhost:8000/events");Listening to events
To listen to default events i.e. events that don't have an
eventfield sent from the server we can attach a callback toonmessageeventSource.onmessage = (event) => console.log('Default event:', event.data)To listen to custom events i.e. events where the
eventfield has some custom value we can attach a listener for that specific event. Say the event isevent: score-updatethen the listener will be as follows:eventSource.addEventListener("score-update", (event) => console.log('score-update event:', event.data);)Closing the connection
eventSource.close()Now that you have a good understanding of the EventSource interface, let's dive into the
useNotificationshook.
Understanding the
useNotificationshook, the main purpose of this hook is to maintain a list of notifications and update the list whenever a new notification arrives.Let's start writing this hook step by step:
We will create a state variable to keep track of the list of notifications
💬We are initialising it with some default notifications to begin with.import { useEffect, useRef, useState } from "react"; import toast from "react-hot-toast"; const EVENT_SOURCE_URL = "http://localhost:3000/events"; const SAMPLE_NOTIFICATIONS = [ { title: "New user!", info: "A new user registered" }, { title: "Invite received", info: "Received invite from Jane" }, { title: "Email sent", info: "Doc access email sent to Joe" }, ]; const useNotifications = () => { const [notifications, setNotifications] = useState(SAMPLE_NOTIFICATIONS); return notifications; }; export default useNotifications;Next, we need to establish the event connection by creating a new instance of
EventSource.We will pass this logic to a
useEffecthook with an empty dependency array.useEffect(() => { const eventSource = new EventSource(EVENT_SOURCE_URL); eventSource.onopen = () => { console.log("Connection to server opened."); }; eventSource.onerror = () => { console.log("Error occurred while connecting."); }; }, []);We have attached custom listeners for
onopenandonerrorevents to check if the connection was established successfully or if there were any errors.Now we will add the logic for the most important part of this hook which is to receive the notification and add it to the notifications list.
We will use theonmessagecallback which gets triggered as and when the client receives a default event (i.e. events without any custom event type) from the event source.useEffect(() => { // code mentioned in above points // ... // ... eventSource.onmessage = (event) => { toast("You have a new notification!"); try { const data = JSON.parse(event.data); setNotifications((prevData) => [data, ...prevData]); console.log("Received data:", data); } catch { console.log("Something went wrong while receiving data"); } }; }, []);We will show a toast message indicating the users of a new notification.
react-hot-toast is the library we are using for the toast.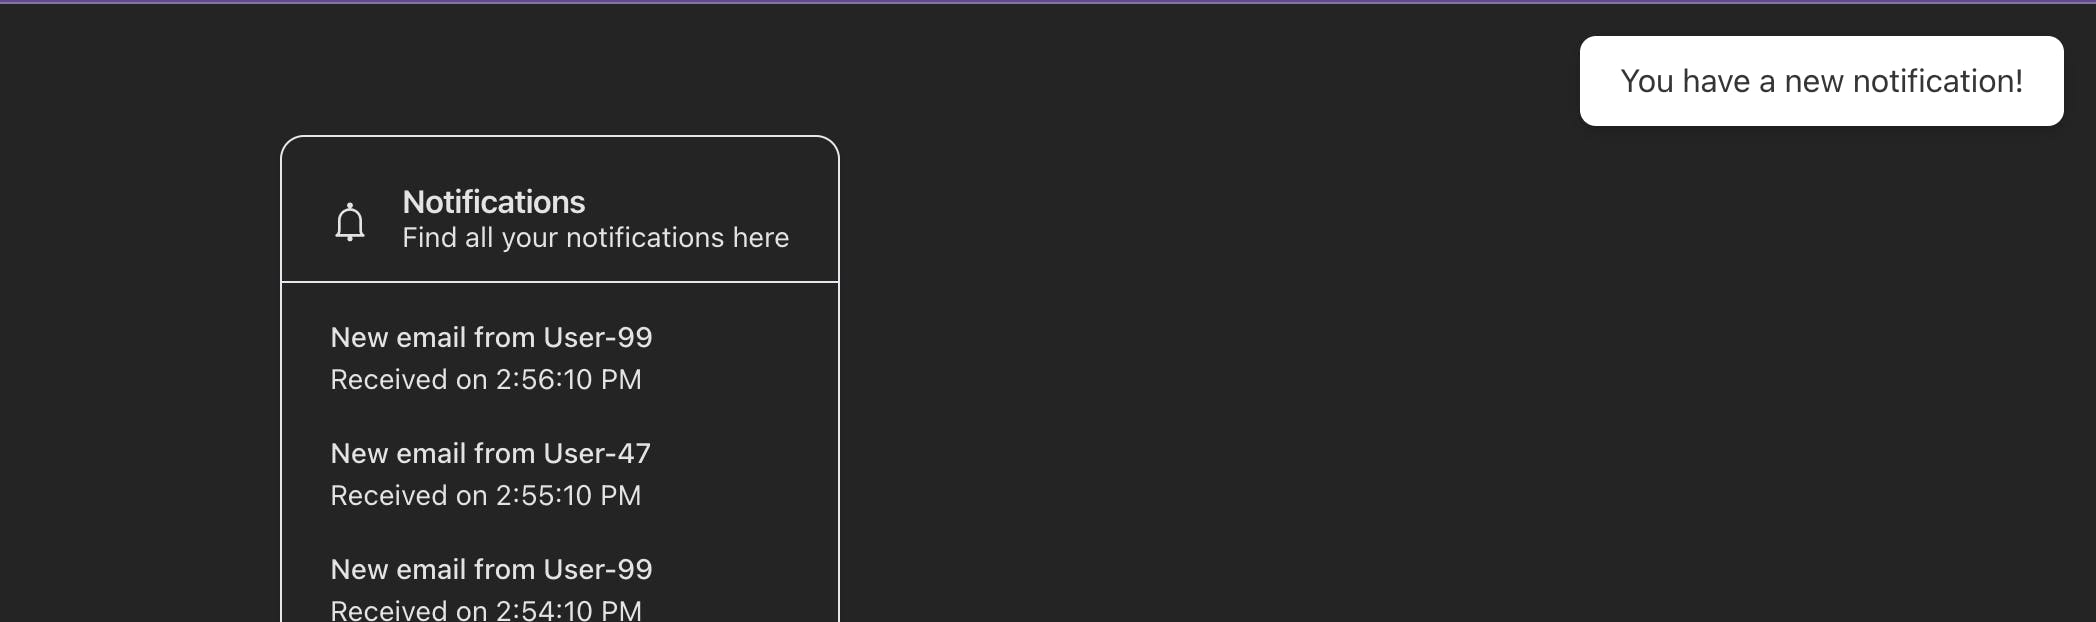
The event's data property holds our stringified notification data so we need to parse the data first.
Once the data has been successfully parsed we add it to the top of the notifications list, so that the latest notifications are always on top.The hook is almost ready but one last and important step is to close the event connection as a part of the hook's clean up process.
   useEffect(() => {
     // code mentioned in above points
     // ...
     // ...
     return () => {
       eventSource.close();
     };
   }, []);
This is the final version of the hook:
import { useEffect, useState } from "react"; import toast from "react-hot-toast"; const EVENT_SOURCE_URL = "http://localhost:3000/events"; const SAMPLE_NOTIFICATIONS = [ { id: 1, title: "New user!", info: "A new user registered" }, { id: 2, title: "Invite received", info: "Received invite from Jane" }, { id: 3, title: "Email sent", info: "Doc access email sent to Joe" }, ]; const useNotifications = () => { const [notifications, setNotifications] = useState(SAMPLE_NOTIFICATIONS); useEffect(() => { const eventSource = new EventSource(EVENT_SOURCE_URL); eventSource.onopen = () => { console.log("Connection to server opened."); }; eventSource.onerror = () => { console.log("Error occurred while connecting."); }; eventSource.onmessage = (event) => { toast("You have a new notification!"); try { const data = JSON.parse(event.data); setNotifications((prevData) => [data, ...prevData]); console.log("Received data:", data); } catch { console.log("Something went wrong while receiving data"); } }; return () => { eventSource.close(); }; }, []); return notifications; }; export default useNotifications;⚠Note: This hook is not production-ready as there can be a few cases like preventing duplicate connections, etc. which might need to be handled before using it in a production scenario.
Our React notifications app's UI is now ready 😍. Let's start adding the backend logic.
Writing the server-side SSE logic
We will create an HTTP server in Node.js, opting to keep things simple by avoiding the use of external libraries or frameworks such as Express or Nest.
Create a file called
server.jsand add the following linesconst http = require("http"); const server = http.createServer((req, res) => {} }); server.listen(3000, () => { console.log("Server running on port 3000"); });We can then start the server by executing
node server.jsfrom the terminal.The server should be up and running at port 3000.
Before implementing the SSE logic, let's review a few requirements that the server must adhere to according to the SSE protocol.
Rule 1:
Thecontent-typeheader should be set astext/event-streamRule 2:
Each message in the event stream should be plain text following the event stream format.
The field name can be any of those mentioned in the table below. Any field value not listed will be ignored.
| Field | Description | Example |
event | This field is used to send custom events. If ignored, the event will be treated as a default event and trigger the onmessage callback on the client side. | event: score-update |
data | This field holds the data for the event stream. When the EventSource receives two or more consecutive lines beginning with data, it will concatenate them into a single message and trigger a single message event. To indicate the end of the stream, the message must be followed by two \n characters. | data: Some message\n\n |
id | Attaches an ID to an event stream, so in case the connection is lost, it will help identify the last event ID. | id: 12345 |
retry | If the connection is lost, the browser automatically tries to reconnect after some delay. By sending a custom retry value, we can change that delay. | retry: 30000 |
Now that the rules are clear, let's proceed with implementing the SSE logic. As observed in the UI code above, it anticipates events originating from the
/eventsendpoint.const server = http.createServer((req, res) => { if (req.url === "/events") { // SSE logic comes here } });As per Rule 1, the server must send the
content-typeheader astext/event-stream//... if (req.url === "/events") { res.writeHead(200, { "Content-Type": "text/event-stream", "access-control-allow-origin": "*", // to prevent CORS issue "Cache-Control": "no-cache", Connection: "keep-alive", // to prevent disconnecting in case of inactivity }); }We will send a custom notification every 1 minute using the
setIntervalAPI.if (req.url === "/events") { //... const sendEvent = (data) => { res.write(`data: ${JSON.stringify(data)}\n\n`); }; const intervalId = setInterval(() => { sendEvent({ id: Date.now(), title: `New email from User-${Math.floor(Math.random() * 100)}`, info: `Received on ${new Date().toLocaleTimeString()}`, }); }, 60000); //... }The notification data is an object with three fields
id,titleandinfo.
It is passed to a functionsendEventthat is responsible for taking the data and sending it to the client as per the event stream format.Lastly, to ensure that the server isn't sending data to clients even when they are not listening we will clear the interval.
 if (req.url === "/events") {
    // When the client closes the connection, stop sending events
     req.on("close", () => {
       clearInterval(intervalId);
     });
 }
This is the final version of the server:
 const http = require("http");

 const server = http.createServer((req, res) => {
   if (req.url === "/events") {
     res.writeHead(200, {
       "access-control-allow-origin": "*",
       "Content-Type": "text/event-stream",
       "Cache-Control": "no-cache",
       Connection: "keep-alive",
     });

     const sendEvent = (data) => {
       res.write(`data: ${JSON.stringify(data)}\n\n`);
     };

     const intervalId = setInterval(() => {
       sendEvent({
         id: Date.now(),
         title: `New email from User-${Math.floor(Math.random() * 100)}`,
         info: `Received on ${new Date().toLocaleTimeString()}`,
       });
     }, 60000);

     // When the client closes the connection, stop sending events
     req.on("close", () => {
       clearInterval(intervalId);
     });
   }
 });

 server.listen(3000, () => {
   console.log("Server running on port 3000");
 });
Our backend is also ready now 🍻.
Final demo 🚀
Source code